

There’s a reason why roast chicken is considered one of the most honest tests of a cook’s skill. As chef Thomas Keller once said, he would rather eat a well-roasted chicken than almost anything else. There’s no sauce to hide behind, no complex spice blend to distract, just chicken, salt, heat, and time.
But for all its simplicity, roasting a whole chicken is surprisingly intimidating for many home cooks. One may pull the bird too early out of fear of drying it out, or leave it in too long “just to be safe.” The result is either an undercooked center or stringy, dry breasts. The breast meat, lean, quick to cook, and unforgiving, is usually the first to suffer.
The good news? With the right technique and one wireless meat thermometer with app, you can roast a whole chicken that’s golden and crispy on the outside, juicy and tender on the inside, every single time.
Why Does Chicken Breast Dry Out So Easily?
Understanding the problem is the first step to solving it.
A whole chicken is made up of two very different types of meat. The breast is white meat, lean, with little fat or connective tissue. It cooks quickly and dries out fast when overcooked. The thighs and legs are dark meat, rich in fat and collagen, which breaks down slowly and keeps the meat moist even with longer cooking times.
This creates a classic cooking dilemma: by the time the dark meat is fully cooked and tender, the breast is often dry and stringy. The USDA recommends cooking poultry to a safe minimum internal temperature of 165°F. But if you cook the breast all the way to 165°F in the oven, carryover cooking (the residual heat that continues to cook the meat after it’s removed from the oven) will push it even higher, often to 170°F or more. At that temperature, the breast proteins have tightened up and squeezed out all the moisture.
The secret? Pull the chicken out of the oven before the breast reaches 165°F, and let carryover cooking finish the job.
The Science of Carryover Cooking
Carryover cooking is one of the most important and most overlooked concepts in roasting. When you remove a chicken from the oven, the exterior is hotter than the interior. That heat continues to travel inward, raising the internal temperature by 5 to 10°F over the next 10 to 15 minutes. This means if you pull the chicken when the breast reads 155-160°F, it will coast up to a safe and juicy 165°F while resting.
This resting period is not optional, but it’s essential. It allows the juices to redistribute throughout the meat. If you carve immediately, those juices will spill out onto the cutting board instead of staying in the meat.
The takeaway: A meat thermometer isn’t just for checking doneness. It’s for predicting doneness. You need to know exactly when to pull the bird out so carryover cooking can work its magic.
Step-by-Step Guide to the Perfect Roast Chicken
Step 1: Start with a Dry Brine (The Night Before)
The single biggest improvement you can make to a roast chicken is dry-brining it overnight.
Pat the chicken thoroughly dry inside and out with paper towels. Season generously all over and inside the cavity with kosher salt about 1 tablespoon for a 3½ to 4-pound bird. Place it uncovered on a rack set over a sheet pan in the refrigerator.
The salt draws out moisture from the skin, which then gets reabsorbed along with the seasoning, while the exposed skin dries out for superior crisping. Leave it for at least 4 hours, but overnight is even better.
Step 2: Bring the Chicken to Room Temperature
Remove the chicken from the refrigerator about 30 to 60 minutes before roasting. A cold bird going into a hot oven will cook unevenly, the exterior will burn before the interior is done. Letting it take the chill off ensures more even cooking.
Step 3: Preheat the Oven and Prep the Bird
Preheat your oven to 425°F. High heat gives you crispy, golden skin and a shorter cook time.
While the oven heats, rub softened butter over the breast and thighs. Season with black pepper. Stuff the cavity with aromatics, lemon halves, garlic, fresh thyme, and rosemary work beautifully.
Tuck the wing tips behind the back and tie the legs together loosely with kitchen twine. Trussing helps the chicken cook more evenly by keeping the wings and legs close to the body. Just don’t tie too tightly, loose ties allow heat to circulate into the inner thigh, the area that takes longest to cook.
Step 4: Roast and Stop Guessing
Place the chicken breast-side up on a rack in a roasting pan. Roast at 425°F for 60 to 75 minutes, depending on the size of your bird.
Here’s a rough guide for a 425°F oven:
l 3-3½ lbs: 50 min-1 hr 10 min
l 3½-4 lbs: 1 hr-1 hr 30 min
l 4-4½ lbs: 1 hr 15 min-1 hr 55 min
But here’s the critical point: These times are just guidelines. Bird size varies, ovens run hot or cool, and a chicken pulled straight from the refrigerator behaves very differently than one that has had time to warm up. Charts and guidelines are useful starting points, but a reliable meat thermometer will always do more work than any of them.
You need to know two temperatures:
l The breast should read 155-160°F when you pull it from the oven
l The thigh should read 175°F or higher, dark meat needs more heat to break down collagen and become tender
When the breast hits 155-160°F, remove the chicken from the oven immediately. Transfer it to a cutting board, tent loosely with foil, and let it rest for 15 to 20 minutes. During this rest, carryover cooking will bring the breast to a perfect 165°F while the juices redistribute throughout the meat.
Step 5: Carve and Serve
After resting, carve the chicken and serve with a sprinkle of flaky salt. Spoon the pan juices over the carved meat for extra flavor and moisture.
Why a Meat Thermometer Is Essential?
If you take one thing away from this guide, let it be this: you cannot roast a chicken perfectly without a meat thermometer.
Time estimates alone can’t be trusted. A 4-pound chicken might take 1 hour 15 minutes in one oven and 1 hour 45 minutes in another. The difference between juicy and dry is just a few degrees. Opening the oven to poke, prod, or visually guess drops the temperature and disrupts the browning process. And visual cues like “the juices run clear” or “the skin is golden brown” are unreliable, they tell you nothing about what’s happening inside the meat.
A meat thermometer gives you certainty. It tells you exactly when to pull the bird, so you never have to guess again.
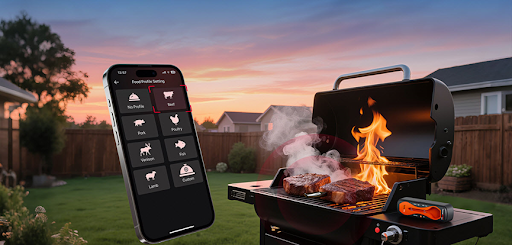
If you’re serious about roasting perfect chicken, you need a wireless meat thermometer that works with you. That’s where the TempSpike Plus TP970 Wireless Meat Thermometer comes in.
What Makes the TempSpike Plus TP970 Different?
100% Wire-Free Design
Traditional meat thermometers require a wire running from the meat, out of the oven, to a display unit. These wires kink, melt, and prevent you from using a rotisserie or closing the oven door properly. The TempSpike Plus TP970 solves this by placing the entire sensor package directly into the stainless steel probe. There are no wires to tangle, no cables to thread through the oven door, just pure, wireless convenience.
Dual Sensors for Total Control
The TempSpike Plus TP970 features dual temperature sensors that monitor both the internal temperature of the meat and the ambient temperature of the oven simultaneously. This means you can see exactly what’s happening inside the bird and inside the oven, all from one device. It’s the difference between blindly hoping your chicken is cooked and surgically executing the perfect roast.
600-Foot Bluetooth Range
The charging base acts as a Bluetooth booster, catching the signal from the wire-free probe and transmitting it up to 600 feet away to your smartphone. You can monitor your roast from the backyard, the living room, or anywhere else in the house without losing connection.
Thin Probe, Minimal Juice Loss
The wire-free probe is optimized to be thin and small, making it suitable for meat of different sizes, even smaller cuts. The probe mean minimal juice loss when inserted, preserving the moisture and integrity of your meat.
Smart App with USDA Temperature Guidelines
The companion app features pre-programmed USDA temperature targets for every major meat type, along with customizable temperature-triggered alerts. You can set an alarm to go off when the breast hits 155°F so you never miss the perfect pull-out moment. The app also allows for fully customized target temperatures and pre-alarms, alerting you 5 degrees before the meat is done to account for carryover cooking.
IP67 Waterproof and Rechargeable
The probe is IP67 waterproof, so it can be rinsed under running water for easy cleanup. And it’s rechargeable.
Common Mistakes to Avoid Overcooking Chicken
Mistake #1: Skipping the meat thermometer
Overcooking is the #1 cause of dry chicken. Without a meat thermometer, you’re flying blind. Even experienced chefs use meat thermometers.
Mistake #2: Pulling the chicken at 165°F
If you pull at 165°F, carryover cooking will push it to 170°F or higher. Pull at 155-160°F instead, and let carryover do the rest.
Mistake #3: Skipping the rest
Resting isn’t optional. It’s what allows the juices to redistribute and carryover cooking to finish the job. Give it at least 15 minutes.
Mistake #4: Opening the oven constantly
Every time you open the oven, you lose heat and disrupt the cooking process. Trust your meat thermometer and let the oven do its work.
Mistake #5: Not drying the skin
Pat it dry before seasoning, and let the dry brine do its magic in the refrigerator overnight.
Final Thoughts
Roasting a whole chicken shouldn’t be stressful. It should be one of the most reliable, rewarding dishes in your cooking repertoire. With the right technique and the TempSpike Plus TP970 Wireless Meat Thermometer, you can achieve juicy, flavorful, perfectly cooked chicken every single time.
Stop guessing. Start roasting with confidence. Your taste buds and your dinner guests will thank you.


